Hi All,
I share with you the learning experience setting up all that is necessary for you to use your Arduino UNO setup with the marvels that await when hooked up to Edge Impulse! ![]()
1. Edge Impulse Account and Project Setup
Ensure you have an Edge Impulse account and have created a project where you want to send your data.
2. Install Edge Impulse CLI
- Install the Edge Impulse Command Line Interface (CLI) on your computer. This tool is essential for sending data to Edge Impulse. Follow the instructions here for installation. Installation - Edge Impulse Documentation
- Install Python 3 on your host computer: https://www.python.org/
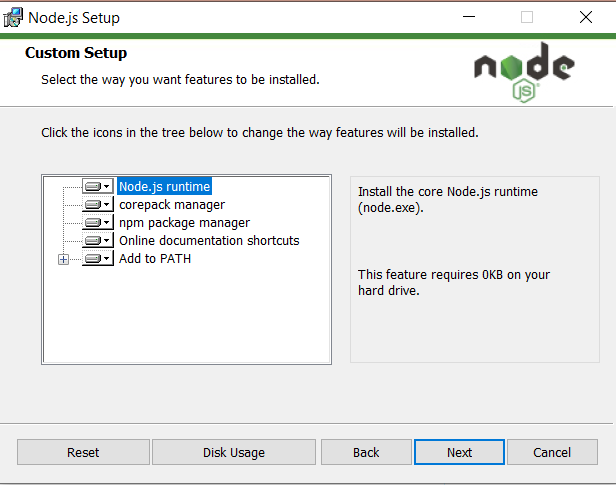
- Install Node.js v16 or above on your host computer: Node.js
- For Windows users, install the Additional Node.js tools (called Tools for Native Modules on newer versions) when prompted.
- Open your PowerShell (Admin), and install the CLI tools via:
npm install -g edge-impulse-cli --force
- You should now have the tools available in your PATH.
Change PowerShell Execution Policy:
- Open PowerShell
- Check current execution policy:
Get-ExecutionPolicy >> AllSigned
- Set execution policy to bypass:
Set-ExecutionPolicy Bypass -Scope Process
Set-ExecutionPolicy Bypass -Scope LocalMachine
- Run the Edge Impulse CLI Commands [all should read 1.22.0]:
edge-impulse-daemon --version
edge-impulse-data-forwarder --version
edge-impulse-uploader --version
- To revert to Restricted Policy run the following command (but dont):
Set-ExecutionPolicy -Scope Process
Set-ExecutionPolicy -Scope LocalMachine
3. Format Your Data
- Edge Impulse requires data in a specific format. Ensure your sensor data is formatted correctly according to the Data Acquisition Format: https://docs.edgeimpulse.com/reference/data-acquisition-format.
- I tried first to have my Arduino sketch output data in a JSON format that Edge Impulse could ingest, but that did not work. What actually works is a simple one line feed per readout with all your sensor data separated by a comma. ONLY numerical values should be included!!
- I include a copy of my own Arduino UNO sketch at the very end of this article.
4. Data Forwarding from Arduino to Edge Impulse
Use the Edge Impulse CLI Data Forwarder to send data from your Arduino to your Edge Impulse project.
- Open the Edge Impulse account and project.
- Connect your Arduino to your computer.
- Run the Arduino sketch without activating the Serial Monitor.
- Open a PowerShell command prompt and run the following:
Set-ExecutionPolicy -ExecutionPolicy Unrestricted -Scope CurrentUser
cd C:\Users\YOUR_PC_NAME\direct_route_to_folder_where_running_ArduinoUNO_sketch_is.
- Make sure you set delay(400); on your Arduino sketch. then run (alternative frequency settings on section #5 below):
edge-impulse-data-forwarder --baud-rate 9600 --frequency 2.5
- Follow the prompts to connect your device to your Edge Impulse project. Use the SAME COM port you have set on your Arduino IDE.
5. Issues you may find in the process and how to solve them:
In case you have issues connecting your Arduino, here are some key points to considering checking on:
- Review Data Format: Ensure that the data being sent from your Arduino matches the format expected by the data forwarder. The forwarder expects a specific format, typically a comma-separated list of numerical values. Any deviation might cause issues.
- Check Serial Data: Ensure that no other process (like the Arduino IDE Serial Monitor) is accessing the COM port when you’re trying to use the data forwarder. Only one application can use the COM port at a time.
-
Data Rate Consistency: Double-check that the baud rate in your Arduino sketch (
Serial.begin(9600);) matches the baud rate specified in the data forwarder command (--baud-rate 9600). Mismatched baud rates can lead to communication problems. - Arduino Sketch Validation: Ensure that your Arduino sketch only outputs the sensor data in the expected format and doesn’t include additional print statements that might be sending unexpected data to the serial port.
- Reboot the System: Sometimes, simply rebooting your computer can resolve port-related issues.
-
Test with Different Frequency Values: Try running the data forwarder with different frequency values using the
--frequencyparameter to see if it makes a difference. Some options:
- For 2.5Hz frequency, on your Arduion sketch use:
delay(400); // Delay for 2.55Hz frequency
edge-impulse-data-forwarder --baud-rate 9600 --frequency 2.5
- For 5Hz frequency, on your Arduion sketch use:
delay(200); // Delay for 5Hz frequency
edge-impulse-data-forwarder --baud-rate 9600 --frequency 5
- Inspect COM Port Status: Check in your computer’s device manager to ensure that the COM port is functioning correctly and that there are no driver issues or conflicts.
-
Update Edge Impulse CLI: Make sure you have the latest version of the Edge Impulse CLI. Run
npm update -g edge-impulse-clito update it. - Try a Different USB Port: Sometimes, switching to a different USB port can resolve connection issues.
- Refresh the connection If the system closes for any reason, refresh the connection by first disconnecting the previous connection:
edge-impulse-data-forwarder --clean
BIG “SAVE A HEADACHE” BONUS: If there is an error stating: “Failed to get information off device. No valid sensor readings received from device:” but then prints out an actual sensor read, then do the following:
- set the last sensor read on your Arduino sketch to NOT include a new line character [ie Serial.print(last_sensor_variable);],
- call the CLI,
- it will give you the same error but this time with a long read (two data series together),
- then update the sketch with a new line character [ie Serial.println(last_sensor_variable)],
- call the CLI again.
The reason adding “Serial.print(last_sensor_variable)” without a new line, might be helping could be due to the data forwarder detecting the continuous stream of data (even though it was not correctly formatted). Then, switching back to Serial.println(moisture); with the new line at the end helps to correctly format the data into separate lines, which the data forwarder can then properly parse and recognize.
5. Test Data Ingestion
Once set up, your Arduino UNO will send data to Edge Impulse via the Data Forwarder.
- Go to your Edge Impulse project dashboard to see if the data is being received correctly.
6. Sample Arduino UNO sketch with 3 sensors reading: Light, Temperature, Air Humidity, and Soil Moisture
/*
Reads analog inputs for three sensors attached to an Arduino UNO board:
- External Photoresistor Sensor (for daylight intensity monitoring) [Analog] >> Pin: A0
- External Temperature Sensor [DHT11] >> Pin: 8
- External Air Humidity Sensor [DHT11] >> Pin: 8
- External Soil Moisture Sensor (for rainfall control) [Analog] >> Pin: A1
The Arduino sketch prints readout in the following comma separated order:
- light = value generated by the photoresistor [A0, int, signal range from 0 no light, to 1023 maximum light.]
- temperature = value generated by the DHT11 sensor [8, int, celcius range from 0 to 50.]
- airhumidity = value generated by the DHT11 sensor [8, int, percentual relative humidity range from 5 to 90]
- moisture = value generated by the soil moisture sensor [A1, int, the sensor generates a value from 0 to 1023.]
This example code is in the public domain.
https://github.com/noospheracr/clima
*/
// THE LIBRARY INCLUSION ROUTINE (make sure to install in your Arduino Library first):
#include <Wire.h>
#include “DHT.h” // DHT Sensor libraries are inluded
#include “DHT_U.h” // DHT Sensor libraries are inluded
// THE VARIABLE DECLARATION ROUTINE:
int SENSOR = 8; // DATA from the DHT11 on digital pin 8
DHT dht(SENSOR, DHT11); // The DHT11 Digital Sensor object is created.
// THE SETUP ROUTINE:
void setup() {
Serial.begin(9600); // Serial communication is initialized at 9600 bits per second.
dht.begin(); // DHT11 Sensor is initialized.
}
// THE SENSOR READ & PRINT ROUTINE:
void loop() {
int moisture = analogRead(A1); // Reads the input on analog pin A1, and stores it in MOISTURE.
int light = analogRead(A0); // Reads the input on analog pin A0, and stores it in LIGHT.
int temperature = dht.readTemperature(); // Reads the Temperature sensor input on DHT11, and stores it in TEMPERATURE.
int airhumidity = dht.readHumidity(); // Reads the Humidity sensor input on DHT11, and stores it in AIRHUMIDITY.
Serial.print(light);
Serial.print(“,”);
Serial.print(temperature);
Serial.print(“,”);
Serial.print(airhumidity);
Serial.print(“,”);
Serial.println(moisture);
//If your interaction with EdgeImpulse gets “stuck”, simply update the last sensor variable (ie moisture) to Serial.print(moisture);
//Run the updated Sketch, run the CLI you will get the same error, then update the sketch back as it should be, and then run the CLI again.
// Delay for 2.5 Hz
delay(400);
}