Arduino PortentaH7 Lite, PortentaH7 and the Vision Shield

Arduino has announced the PortentaH7 Lite a slightly cheaper version of the PortentaH7.


with a blog and video at

This brings up a good point. Is anyone at Edge Impulse interested in working on the Vision Shield software that works on the Portenta to load an Edge Impulse model?

Last I responded with @janjongboom Edge was waiting for the Memory upgrades here to allow memory flexibility between the Portenta 2 cores, but those upgrades are not really going to change things dramatically they are just going to allow bigger models to be loaded.

Last I worked with it, it was very difficult to monitor anything since you had know idea what the camera was seeing. I am going to see if I can get an OLED working with the camera to simplify this issue. I also have old code that used to work which I would like to have someone look at and make some suggestions for improving, tidying it up. Perhaps @dansitu or @aurel ?

I start my after school Machine Learning October 7th and would like to use the Portenta, but I am worried that I can’t get vision working for them.

Here is my code that used to work.

/*
 * 
 * Must use portenta camerera explained in this PR
 * https://github.com/arduino/ArduinoCore-mbed/pull/122
 * Should be implemented with MBED version greater than 1.3.1
 * Until then needs the 2 main library folders Portenta_Camera and Himax_HM01B0
 * 
 * 
 */


#define EI_DSP_IMAGE_BUFFER_STATIC_SIZE 128


/* Includes ---------------------------------------------------------------- */
#include <ov7670-08-detect-micro-restored_inference.h>

#include "camera.h"

CameraClass myCam;


// raw frame buffer from the camera
#define FRAME_BUFFER_COLS          320   // 160
#define FRAME_BUFFER_ROWS          240   // 120
//uint16_t frame_buffer[FRAME_BUFFER_COLS * FRAME_BUFFER_ROWS] = { 0 };

uint8_t frame_buffer[320*240] __attribute__((aligned(32)));

// cutout that we want (this does not do a resize, which would also be an option, but you'll need some resize lib for that)
#define CUTOUT_COLS                 EI_CLASSIFIER_INPUT_WIDTH
#define CUTOUT_ROWS                 EI_CLASSIFIER_INPUT_HEIGHT
const int cutout_row_start = (FRAME_BUFFER_ROWS - CUTOUT_ROWS) / 2;
const int cutout_col_start = (FRAME_BUFFER_COLS - CUTOUT_COLS) / 2;

/**
 * This function is called by the classifier to get data
 * We don't want to have a separate copy of the cutout here, so we'll read from the frame buffer dynamically
 */
int cutout_get_data(size_t offset, size_t length, float *out_ptr) {
    // so offset and length naturally operate on the *cutout*, so we need to cut it out from the real framebuffer
    size_t bytes_left = length;
    size_t out_ptr_ix = 0;

    // read byte for byte
    while (bytes_left != 0) {
        // find location of the byte in the cutout
        size_t cutout_row = floor(offset / CUTOUT_COLS);
        size_t cutout_col = offset - (cutout_row * CUTOUT_COLS);

        // then read the value from the real frame buffer
        size_t frame_buffer_row = cutout_row + cutout_row_start;
        size_t frame_buffer_col = cutout_col + cutout_col_start;

        // grab the value and convert to r/g/b
        uint8_t pixel = frame_buffer[(frame_buffer_row * FRAME_BUFFER_COLS) + frame_buffer_col];


        //uint8_t pixel = (pixelTemp>>8) | (pixelTemp<<8);
        //uint8_t pixel = 255-pixelTemp;
        
        uint8_t r = pixel;
        uint8_t g = pixel;
        uint8_t b = pixel;

        // then convert to out_ptr format
        float pixel_f = (r << 16) + (g << 8) + b;
        out_ptr[out_ptr_ix] = pixel_f;

        // and go to the next pixel
        out_ptr_ix++;
        offset++;
        bytes_left--;
    }

    // and done!
    return 0;
}


/**
 * @brief      Arduino setup function
 */
void setup()
{
    // put your setup code here, to run once:
    Serial.begin(115200);
     // Serial.begin(921600);

  // Init the cam
  myCam.begin(CAMERA_R320x240, 30);

  // Skip 60 frames
 // myCam.skip_frames(frame_buffer, 30);

    Serial.println("Edge Impulse Inferencing Demo");
}

/**
 * @brief      Arduino main function
 */
void loop()
{
    ei_printf("Edge Impulse standalone inferencing (Arduino)\n");


    ei_impulse_result_t result = { 0 };


     // if (Serial) {
    // Grab frame and write to serial
   // if (cam.grab(frame_buffer) == 0) {
    //  Serial.write(frame_buffer, 320*240);
   // }
  //}
     // potentially need to check for above framebuffer == 0
     
   int myCamResult =  myCam.grab(frame_buffer); // myCamResult should be zero 

  //  int myCamResult;
  //  do {
  //      myCamResult =  myCam.grab(frame_buffer);
   // } while (myCamResult != 0);
  
 // myCam.skip_frames(frame_buffer, 60);

    // the features are stored into flash, and we don't want to load everything into RAM
    signal_t features_signal;
    features_signal.total_length = CUTOUT_COLS * CUTOUT_ROWS;
    features_signal.get_data = &cutout_get_data;

    // invoke the impulse
    EI_IMPULSE_ERROR res = run_classifier(&features_signal, &result, false /* debug */);
    ei_printf("run_classifier returned: %d\n", res);

    if (res != 0) return;

    // print the predictions
    ei_printf("Predictions ");
    ei_printf("(DSP: %d ms., Classification: %d ms., Anomaly: %d ms.)",
        result.timing.dsp, result.timing.classification, result.timing.anomaly);
    ei_printf(": \n");
    ei_printf("[");
    for (size_t ix = 0; ix < EI_CLASSIFIER_LABEL_COUNT; ix++) {
        ei_printf("%.5f", result.classification[ix].value);
#if EI_CLASSIFIER_HAS_ANOMALY == 1
        ei_printf(", ");
#else
        if (ix != EI_CLASSIFIER_LABEL_COUNT - 1) {
            ei_printf(", ");
        }
#endif
    }
#if EI_CLASSIFIER_HAS_ANOMALY == 1
    ei_printf("%.3f", result.anomaly);
#endif
    ei_printf("]\n");

    // human-readable predictions
    for (size_t ix = 0; ix < EI_CLASSIFIER_LABEL_COUNT; ix++) {
        ei_printf("    %s: %.5f\n", result.classification[ix].label, result.classification[ix].value);
    }
#if EI_CLASSIFIER_HAS_ANOMALY == 1
    ei_printf("    anomaly score: %.3f\n", result.anomaly);
#endif


/*   unbracket to grab an image of what the board sees   */


    for (size_t ix = 0; ix < features_signal.total_length; ix++) {
        float value[1];
        features_signal.get_data(ix, 1, value);

        ei_printf("0x%06x", (int)value[0]);
        if (ix != features_signal.total_length - 1) {
          ei_printf(", ");
        }
    }

    Serial.println();
    delay(7000);
}

/**
 * @brief      Printf function uses vsnprintf and output using Arduino Serial
 *
 * @param[in]  format     Variable argument list
 */
void ei_printf(const char *format, ...) {
    static char print_buf[1024] = { 0 };

    va_list args;
    va_start(args, format);
    int r = vsnprintf(print_buf, sizeof(print_buf), format, args);
    va_end(args);

    if (r > 0) {
        Serial.write(print_buf);
    }
}

I will probably post working code Portenta Vision Code here on my new Maker100 curriculum. (Lots of other Portenta maker examples there)

@Rocksetta Yes @rjames is working on this.

That is excellent. Hopefully @rjames can touch base.

Is there a repository that is being worked on. I would love to be able to test things and give some feedback.

Hi @Rocksetta,

At the moment we don’t have a public repo. But as soon as some update’s I’ll get back to you.
Thanks for the post.

// Raul

@rjames

I just got my OLED working with the Vision shield. It is very fast but I was confused till I realized I was using a 48x48 model I made for the Nano33Ble with OV7670 Camera. Just making a bigger model.

Working on the code at this Github Repo here

So I do have it working, but I now understand why @janjongboom is waiting for memory flexibility between the cores of the Portenta. I could only get the 96x96 Vision Model working. A 120 x 120 crashed. The Grove OLED is probably taking up some of the memory. I will try with the inner core later. Probably not a good idea to put the OLED and Edge Model on different cores since the communication between cores is not very fast.

Green LED means it is not spotting a microcontroller. Blue LED means microcontroller is detected.

Stapler is not a microcontroller, Green LED (Looks like the image is reversed, I have seen that before with these models)

.

.

Portenta is a microcontroller therefore Blue LED.

Surprisingly fast detection considering I haven’t optimized anything, I was just trying to get it to work. To bad my OLED is monochrome, I had to set a detection limit between black and white. A grayscale OLED would be much better.

So I tried the M4 Core and it would not compile seemed to have issues with both the Edge software and the camera. So the next step is trying the Arduino new flexible memory

Installation is fairly straight forward. Then choose the 2Mb flash for the M7 and no memory for the M4 core. (M4 should load from the SD card, but I am just going to ignore it for now.)

Hi @Rocksetta,

Thanks for your contribution and good work. Your code isn’t too far from what we have at the moment. So we’re on the right track.
Yea in the past, we’ve ran into the not available memory. Last time I tested I was successful using 75/25 split. I’ll be re-testing and updating the source with our latest sdk and optimzations more next week.

// Raul

@rjames. Great work getting the 75:25 M7/M4 split working I did not have success with that, so today I tried the 100:0 M7/M4 split ( 2MB M7 and 0MB M4) using a 96x96 pixel model and it worked fine, but a 120x120 pixel model ran out of TFlite Arena memory.

I think this is an Arduino software issue as I don’t think that model is too large to run out of memory especially using GRAYSCALE.

The issue tracker is being strangely quiet so I think Arduino knows that the full memory is not being assigned. I don’t like bugging Martino at Arduino, but I feel this is so close.

Can some of the Edge Impulse superstars reply ( @janjongboom, @dansitu, @aurel and others … ). I really want to have a bigger than 96x96 pixel Vision model on the Portenta and I am not that interested in accuracy (presently just while I test the memory flexibility Arduino is working on). I would like to trim the layers and wondering which layers you think are most advantageous to reduce model size without killing the basic Machine Learning ability. (As I solved my base question… see further down, lets switch this to which model should I try and what reductions do you suggest.)

Here is an image of the present 96x96 compared to the Vision area (the box is 96x96 skewed a little by the 128x64 Grove OLED)

This is model manipulation area I want to get better at and to make a video about it for my students on my playlist, but I haven’t delved into it yet. Any suggestions for where to start?

A bit confused by the 3 vertical dots. not sure where to find them.

Ok, found that

Wow the model is fairly easy. Think I answered my own question. Either reduce the density (16) of the main layer or pick another model.

image

Probably should not post this as I kind of answered my own question, but maybe someone else is having the same issues. Still need suggestions for other models to try. I noticed a GRAYSCALE model which should probably help.

So with a little playing I found:

Which looks like it’s original size was 224x224, so I tried that and got a much bigger resolution 224x224 working on the Portenta.

The model is far less accurate, than the original 96x96 but from the image you can see the sensing resolution 224x224 is much larger than the original (skewed by the 128x64 pixel screen)

Now just got to wait for Arduino to get memory flexibility working between the cores. Also need to work on simplifying the code.

Hi @Rocksetta! You can actually use all of the transfer learning models with any input size—they are trained and tested on 96x96, but they’ll work with whatever input size you prefer. There may be some impact to accuracy, but often it’s relatively minor.

Warmly,
Dan

@rjames

So I switched from my Monochrome OLED to a 16 color 1.5 inch 128x128 WaveShare greyscale OLED and really like it. Fairly fast and I can see what I am analyzing.

image

@dansitu
This code simply detects a microcontroller and the LED goes blue, it would be green seeing the stapler. The box is the 96x96 classification window, and the code does a “cutout”. See code below


/**
 * This function is called by the classifier to get data
 * We don't want to have a separate copy of the cutout here, so we'll read from the frame buffer dynamically
 */
int cutout_get_data(size_t offset, size_t length, float *out_ptr) {
    // so offset and length naturally operate on the *cutout*, so we need to cut it out from the real framebuffer
    size_t bytes_left = length;
    size_t out_ptr_ix = 0;

    // read byte for byte
    while (bytes_left != 0) {
        // find location of the byte in the cutout
        size_t cutout_row = floor(offset / CUTOUT_COLS);
        size_t cutout_col = offset - (cutout_row * CUTOUT_COLS);

        // then read the value from the real frame buffer
        size_t frame_buffer_row = cutout_row + cutout_row_start;
        size_t frame_buffer_col = cutout_col + cutout_col_start;

        // grab the value and convert to r/g/b
        uint8_t pixel = frame_buffer[(frame_buffer_row * FRAME_BUFFER_COLS) + frame_buffer_col];


        //uint8_t pixel = (pixelTemp>>8) | (pixelTemp<<8);
        //uint8_t pixel = 255-pixelTemp;
        
        uint8_t r = pixel;
        uint8_t g = pixel;
        uint8_t b = pixel;

        // then convert to out_ptr format
        float pixel_f = (r << 16) + (g << 8) + b;
        out_ptr[out_ptr_ix] = pixel_f;

        // and go to the next pixel
        out_ptr_ix++;
        offset++;
        bytes_left--;
    }

    // and done!
    return 0;
}


I know that fancier code can do a “squish” instead of a “cutout” that is what Edge Impulse does when it firsts defines your model. Does anyone know how to do that for Arduino? I hope to have the 320x320 camera activated soon. See Github here With the extra memory size of the Portenta but not an increased heap, I think the 96x96 classification will be fine as long as we use more of the Camera frameBuffer and a Squish might help with that.

Any suggestions or links I can look at?

Hi @Rocksetta that’s awesome!

Yes, instead of cropping in cutout you can take a look at resizeImage() in nano_ble33_sense_camera.ino from our Arduino library export. Note that you can use a single buffer for the input and output buffer.

You can also take a look out our crop_and_interpolate_rgb888() in edge-impulse-sdk/dsp/image/processing.cpp.

The difference between two is the former is our deprecated and ad-hoc function while the latter will consolidate all our image processing functions.

// Raul

1 Like

Thanks so much Raul @rjames. I will look at those. I just tested the Portenta in 320x320 camera view and it crashes even at M7 100:0 M4 so it must use the same heap that the ML model is using. I will put an Issue on Arduino to see if they have any suggestions.

.

Here is the issue I filed

If anyone can add information or star it as important that might help.

@rjames Good luck with all the technical stuff, it is out of my league, I just simplify what already works. If I can help in anyway please let me know. (Please let me test what your working on when it is public)

So I got working:

The Portenta 320x240 camera setting using any Portenta memory split (I used M7 50:50 M4) and the standard 96x96 Edge Impulse model using the cutout technique with the Grayscale 128x128 1.5 inch OLED (Waveshare or Adafruit, I strongly suggest getting this, it is surprisingly fast). My latest sketch shows on screen when a classification match is recorded and counts how many were witnessed.

Code here

(Note the onscreen counter)

What I would like to get working and will need to wait for your version Raul is:

  1. Portenta 320x320 camera
  2. M7 75:25 M4 memory split (or 50:50 if possible)
  3. 1.5 inch 128x128 GrayScale OLED
  4. The newer Edge Impulse resize_image not cutout code
  5. Largest resolution Edge Impulse model possible but fine with 96x96 if that is the best we can do.

Good luck with all the … " you could have a huge heap by just using Portenta_SDRAM library and replacing the calls to malloc and free with ea_malloc and ea_free ." message from Martino!

If you need me to test code just message @Rocksetta or put it in this thread.

Hi @Rocksetta awesome work!!

In light of the new information on the other threads (and on GitHub) have you tried placing the framebuffer on the SDRAM to be able to run larger models? Something like this…

#define EI_CAMERA_RAW_FRAME_BUFFER_COLS           320
#define EI_CAMERA_RAW_FRAME_BUFFER_ROWS           320

#define ALIGN_PTR(p,a)   ((p & (a-1)) ?(((uintptr_t)p + a) & ~(uintptr_t)(a-1)) : p)

static uint8_t *ei_camera_frame_mem;
static uint8_t *ei_camera_frame_buffer; // 32-byte aligned

Do this only once:

   // initialise the entire SDRAM (or choose the amount required)
    SDRAM.begin(SDRAM_START_ADDRESS);

Can be done in a loop:

    ei_camera_frame_mem = (uint8_t *) SDRAM.malloc(EI_CAMERA_RAW_FRAME_BUFFER_COLS * EI_CAMERA_RAW_FRAME_BUFFER_ROWS + 32 /*alignment*/);
    if(ei_camera_frame_mem == NULL) {
        ei_printf("failed to create ei_camera_frame_mem\r\n");
        return false;
    }
    ei_camera_frame_buffer = (uint8_t *)ALIGN_PTR((uintptr_t)ei_camera_frame_mem, 32);

   // do some work

  SDRAM.free(ei_camera_frame_mem);


2 Likes

thanks Raul, Talk Monday. I made a sketch named after you on my github

That was surprisingly easy, yes SDRAM works very well for the Camera 320x320. No speed slowdown. I used my own code which probably has memory leaks.


SDRAMClass mySDRAM;

uint8_t *sdram_frame_buffer;
//uint8_t frame_buffer[320*320];

void setup() {
  //Serial.begin(921600);  
  Serial.begin(115200);  
 
  mySDRAM.begin();
  sdram_frame_buffer = (uint8_t *)mySDRAM.malloc(320 * 320 * sizeof(uint8_t));


then in the main loop I did

if (cam.grab(sdram_frame_buffer) == 0){...

Crashes occasionally probably because nothing is aligned, but working proof is always good.

Question for @rjames, @dansitu, @janjongboom or anyone else that is interested.

With this extra 8 MB SDRAM on the Portenta, could we load multiple models into SDRAM and switch between them?

I did something similar years ago with JavaScript and 2 MINST models here

Presently I don’t know where the Edge Impulse model buffer is formed to be able to switch to SDRAM, but I will look for it this weekend.

Nice when things work. :smiley: 
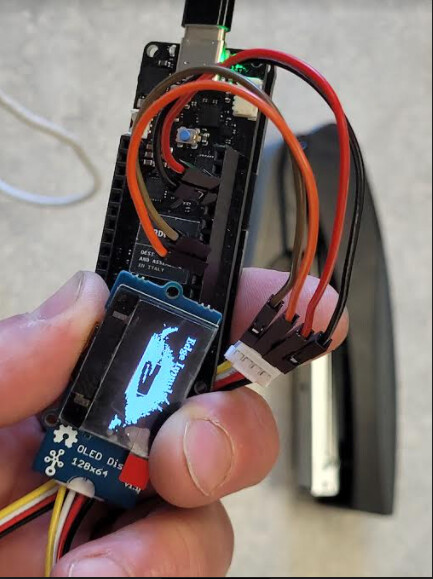
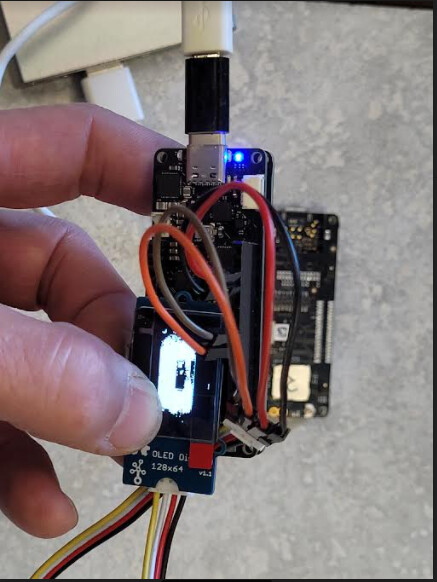
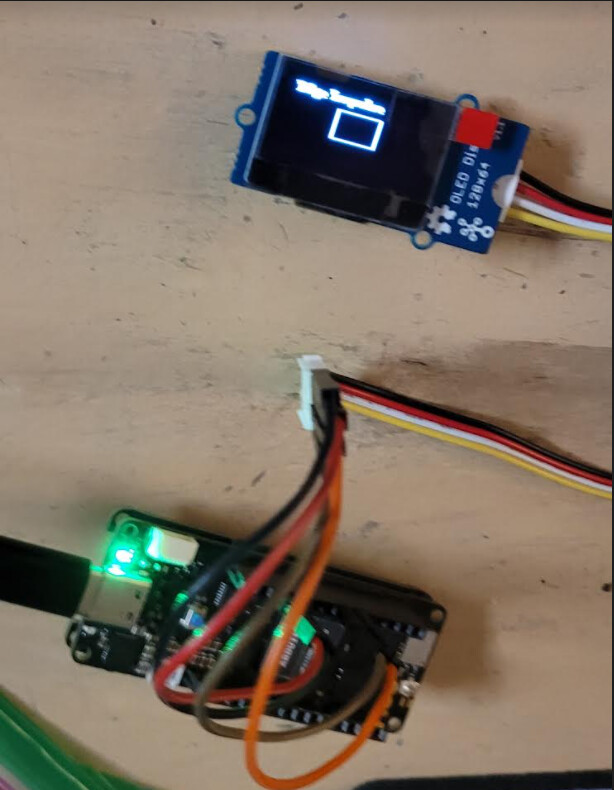
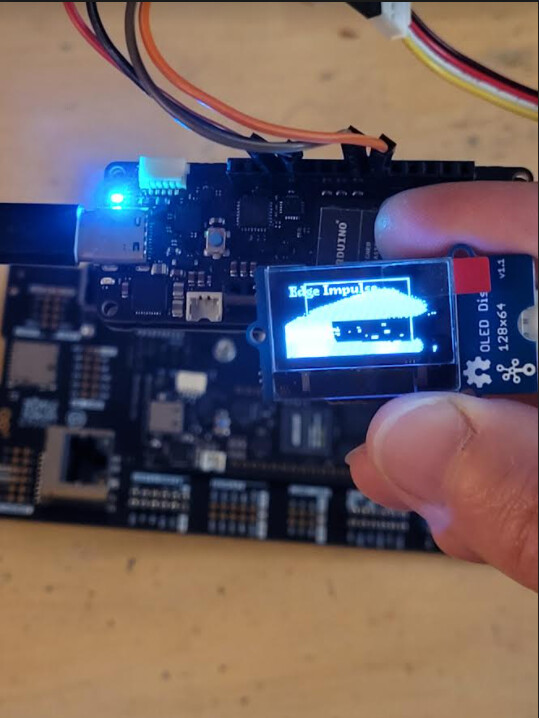
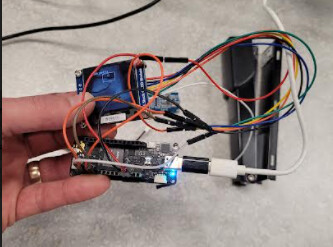
320x320 Portenta Camera classifying 96x96 edge impulse model showing on a 128x128 Grayscale OLED, using M7:M4 50:50

Which could not be run without using SDRAM for the Camera frame buffer!

image

2 Likes

So this is very exciting, using a slightly changed @rjames code above I did get SDRAM working for the Portenta Camera using 320x320 Grayscale, with the 96x96 Edge Impulse model and the 128x128 Grayscale OLED here. Thanks so much Raul for the alignment code snipet, I did not find anything even remotely like it on the web.

The speed that you can move the camera and get detections is amazing for a microcontroller.

I looked into putting the edgeImpulse model into SDRAM but I could not find a main buffer to store. I also looked at TensorflowLight which has much simpler code

unsigned int model_tflite_len = 2640;

const unsigned char model_tflite[] = {...}

but could not figure out how to put the unsigned char array into SDRAM.

Anyway, so far this is all really good news, I just have to figure out how to go from CUTOUT using only the 96x96 pixels to RESIZEIMAGE squishing the full 320x320 images down to 96x96 and I am a bit stuck here. Not sure if I can just replace the cutout function with the resize image function. May need a bit of help with this part.

Once again thanks Raul @rjames

2 Likes

Hello @Rocksetta,

Here is a function that I have been using on the ESP32 Cam: image_resize_linear.
It is a bit tricky to find it on Google but this image_util is doing a pretty good job: https://github.com/espressif/esp-dl/blob/420fc7e219ba98e40a5493b9d4be270db2f2d724/image_util/image_util.c
Feel free to use some of the functions if it can help you.

Regards,

Louis