So the Edge Impulse Ambassadors have the ECM3532 Eta Compute AI Sensor and I think a few Ambassadors are getting the Eta Compute AI Vision Board. Mine should arrive tomorrow, as I paid $25 Canadian for duties/taxes. These boards should work fine with Edge Impulse like other boards we have tried, but like with all boards I am most interested in programming them, getting a feel for how simple it is to program AND using Edge Impulse on them.
Looks like some cool possibly cloud compiler is available at etacompute.com/tensai-software/, just wondering if anyone is familiar with it? (I just want to take it for a spin and blink some LED’s)
Presently slightly stumped by the business email, which I probably should not use my school email. Does anyone know the process to get to the compiler once you have a developer account? I can’t find a single Youtube video about it.
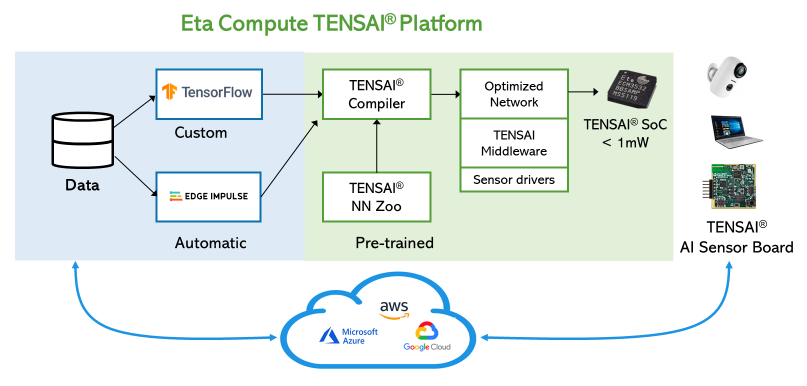
Edge Impulse is even in the diagram!
Personally I try to stay away from the big clouds which always seem to want my credit card while explaining how cheap their service is.
Hi @Rocksetta, you should be able to use https://github.com/edgeimpulse/firmware-eta-compute-ecm3532 to compile for the AI Sensor board (and we’ll update this soon for the Vision board), nothing required except for gcc and make. We’ll be hosting the TENSAI Compiler in Edge Impulse when support for the vision board lands. No need for any cloud accounts.
1 Like
So that is really interesting, I think I can work with that. I made this video today of the ETA Compute AI Sensor Board video here
I use a free online cloud called gitpod.io since getting kids to install GMU ARM on their home computers would be a disaster.
What I want to do is similar to what I have done with several ML models on Arduinos is to take the output from Edge Impulse and change the code slightly to how I want it to run. Not sure, but I assume the steps are:
- Download the impulse as a C++ file
- Save the extracted file somewhere in the file structure of https://github.com/edgeimpulse/firmware-eta-compute-ecm3532
- Edit various source files as needed
- Use make to compile the code
- Download compiled code to the computer that the AI Sensor board is attached to
- Flash code to the AI Sensor Board using a Segger j-link OR create the install files that Edge nicely makes so no j-link is needed.
I will try out those steps, do you see a glaring errors anywhere?
Yep, that should work! There’s instructions on flashing with the Edge Impulse CLI in the repo too, a lot easier than JLink 
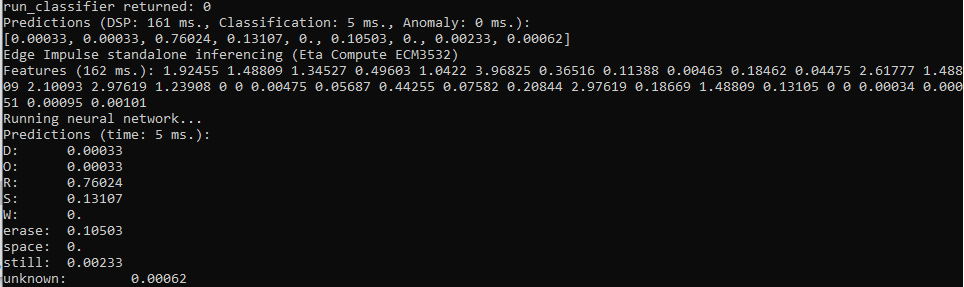
Well that was too easy. Ran my WORDS impulse on the ETAComputer AI Sensor board doing the compiilling on Gitpod without having to install anything. (I used an old OpenThread Gitpod I made a while ago)
Yes that was very sweet.
Drawing an “R” with the ETACompute
.
Quick question @janjongboom , since I have the AI Vision board could I use this method to try running it, since I don’t see the option on Edge Impulse yet?
— updated question.
I can compile a vision impulse for the ETA computer AI Vision board, but it crashes when I insert raw data into the features array (says the file length is too long, weird). I actually want to test without pre-recorded raw data but data from the camera. That will need a different main.cpp file. Any suggestions? I actually don’t even want a serial connection I just want like the Himax camera the LED to light up when a single label is found. That way I can test without a serial connection so I can test the coin cell battery.
1 Like
@Rocksetta, we’ll come out with full support for the new board somewhere in the next few weeks, so I’d wait for that.
1 Like
Yes. I  the method Edge Impulse flashes code. I have your method working for my student for both the Arduino boards and the ETA compute boards, I hope the drag and drop the “file.bin” works with the Silicon Labs Thunderboard. The ST B-L475E-IOT01A looks like it is also drag and drop, but I don’t have one of those.
I have always been a bit confused by the Nordic boards. My online compiler was originally made for OpenThread with The Nordic nRF52840 USB dongle. It creates a .bin file that I then used “nrf-connect for desktop” to install. Looks like things have changed and Nordic now uses a JLINK drive.
Sounds like it is just a pop up drive that students could then drag their .bin file to. Sounds promising, I will have to look into it.