RPI4 Image classification WITHOUT camera

Hi everyone

I have built a model that classified snapshots from a camera.
It takes in input jpg files from an external camera

My model is built, efficient (from the web site) and downloaded back to my RPI4

But what I see is that the RPI4 tries to classify an image from the camera, and I do not want to use the camera : I already have my jpg file to classify !

How can i do that ?
Any idea ?

Thank you in advance for your help / tips :slight_smile:

wisdoom

Hi @Wisdoom,

We have an example using our Python SDK: GitHub - edgeimpulse/linux-sdk-python: Use Edge Impulse for Linux models from Python
Check the Still Image example, it takes a jpg as an argument.

Aurelien

Hello @aurel

I did that : I have used the python example as a basis, and I have made some progresses
Indeed : The model is correctly downloaded to the RPI4, the example script runs with my image.

But now, I am facing some other issues

The symptom is simple : my image is not classified correctly by the RPI
I use the same image that I use to test my model in the studio.
The model can return “Opened” or “Closed” , depending on my awning (Store banne in French) is closed or open.
Using studio, I have a very good accuracy, and the test image returns an “Opened” state. But using the RPI, it always returns a Closed State of 100%

So I checked and have seen an issue with the image resizing
In studio, I use the “Letter Box” resize option, to keep the full image even if it has a 16/9 ratio

But this is not implemented in the python SDK
So I have added a python method to resize it the same way

def resize2SquareKeepingAspectRation(img, size, interpolation):
  h, w = img.shape[:2]
  c = None if len(img.shape) < 3 else img.shape[2]
  if h == w: return cv2.resize(img, (size, size), interpolation)
  if h > w: dif = h
  else:     dif = w
  x_pos = int((dif - w)/2.)
  y_pos = int((dif - h)/2.)
  if c is None:
    mask = np.zeros((dif, dif), dtype=img.dtype)
    mask[y_pos:y_pos+h, x_pos:x_pos+w] = img[:h, :w]
  else:
    mask = np.zeros((dif, dif, c), dtype=img.dtype)
    mask[y_pos:y_pos+h, x_pos:x_pos+w, :] = img[:h, :w, :]
  return cv2.resize(mask, (size, size), interpolation)

the method is called in the python script juste before calling
features, cropped = runner.get_features_from_image(img)

Instead, I use

# imread returns images in BGR format, so we need to convert to RGB
            img = cv2.cvtColor(img, cv2.COLOR_BGR2RGB)

            resized = resize2SquareKeepingAspectRation(img, 160, cv2.INTER_AREA)

            # get_features_from_image also takes a crop direction arguments in case you don't have square images
            features, cropped = runner.get_features_from_image(resized)

But the result is still the same : Closed at 100%

Do you know what could be the cause here ?
Thanks again for your help

Sylvain

Hello @Wisdoom ,

Could you save a version of your image resized with your method on your computer and upload it to your testing dataset and then run the inference using the live inference page from the studio please?

You can do something like that:

resized = resize2SquareKeepingAspectRation(img, 160, cv2.INTER_AREA)
cv2.imwrite("IMAGE_NAME.png", resized)

I just want to be sure it’s classified correctly in the studio and that your resized method does not do anything else too before investigating further.

Let me know :slight_smile:

Regards,

Louis

Hello Louis

I did that, but using : cv2.imwrite(‘resized.png’,cv2.cvtColor(resized, cv2.COLOR_RGB2BGR))
because the image has already been modified by BGR2RVB

The result is “slightly” better in studio, as I get a 50% Opened 50% Closed result :slight_smile:

It seems to me that the produced image is less antialiased that the one produced by Studio, or not antialiased at all

I assumed that you used the float32 version of your model in your python script correct?
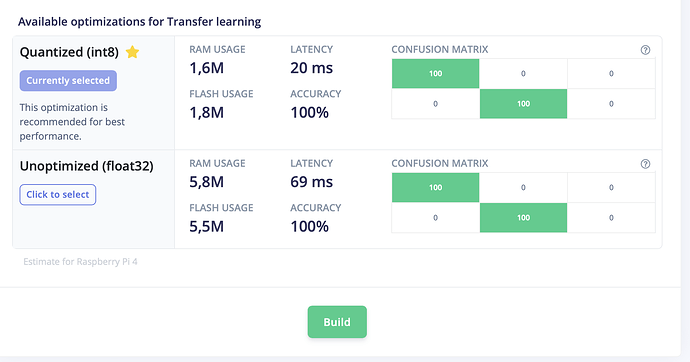
Because the quantized version gives much worse results from what I see in your project.

I can also see that your classes are strongly imbalanced, maybe try to rebalance your weights or try to train again with this parameter enabled.

Hopefully you’ll have a more robust model and the results will be better locally.

Regards,

Louis

Seems that I am using the Quantized from what I see here

Is there any way to switch that at RPI level ou should I build another version with the Studio ?

In parallel I will check this “rebalance” thing

But what scares me is the difference of behavior between local run results and Studio results. I was assuming it was really this image resizing thing that was in cause

The Model Testing on the studio always uses the float32.

You can also download your model using the Edge Impulse Linux CLI, this will download by default the float32 model and will select the right hardware optimizations based on your device.

edge-impulse-linux-runner --download mymodel.eim`

Regards,

Louis

Well, I did have build the float32 model, and have downloaded the new version to the RPI.
The result is still the same :slight_smile:

python script.py ./mymodel.eim open.jpg

MODEL: /home/pi/./mymodel.eim

Loaded runner for "Wisdoom / StoreRecognition"

Result (65 ms.) Closed: 1.00 Opened: 0.00

And another test using the exact same image (downloaded from my test set)

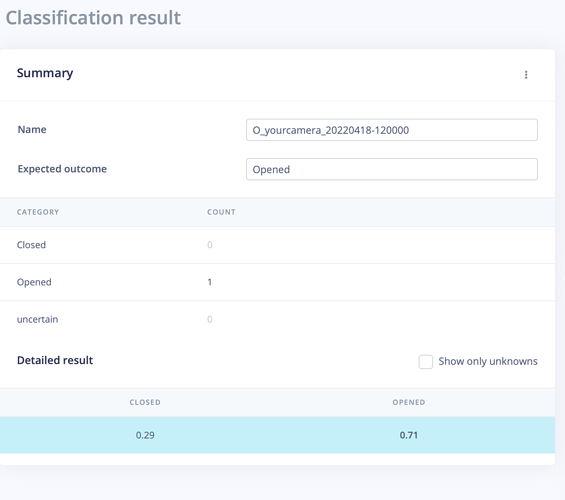
python script.py ./mymodel.eim O_yourcamera_20220418-120000.jpg

MODEL: /home/pi/./mymodel.eim

Loaded runner for "Wisdoom / StoreRecognition"

Result (58 ms.) Closed: 1.00 Opened: 0.00

And in Studio (same image)

This 100% in the RPI run is really different

hi, I was using a nodeJS SDK for the same task - classifying the image file.
I was using sharp npm package to process image and edge-impulse-linux npm module.
So here is a code which I used. Create a package.json file:

{
  "dependencies": {
    "edge-impulse-linux": "^1.3.1",
    "sharp": "^0.30.3"
  }
}

then create a simple js file (I named it classify_image.js on my raspi):

const {  LinuxImpulseRunner } = require("edge-impulse-linux");
const sharp = require('sharp');

// This script expects two arguments:
// 1. The model file
// 2. An image file.

// tslint:disable-next-line: no-floating-promises
async function main () {
    try {
        if (!process.argv[2]) {
            console.log('Missing first argument (model file)');
            process.exit(1);
        }
        if (!process.argv[3]) {
            console.log('Missing second argument (image file)');
            process.exit(1);
        }
        // Load the model
        let runner = new LinuxImpulseRunner(process.argv[2]);
        let imagefile = process.argv[3];
        let model = await runner.init();
        console.log(model.modelParameters.image_input_frames)
        console.log('Starting the custom classifier for',
            model.project.owner + ' / ' + model.project.name, '(v' + model.project.deploy_version + ')');
        console.log('Parameters', 'freq', model.modelParameters.frequency + 'Hz',
            'window length', ((model.modelParameters.input_features_count / model.modelParameters.frequency) * 1000) + 'ms.',
            'classes', model.modelParameters.labels);

            let resized = resizeImage(model, imagefile).then(resized => {
                runner.classify(resized.features).then(classifyRes =>
                    console.log(classifyRes.result)
                )

            });

        await new Promise(resolve => setTimeout(resolve, 1000));

    } catch (ex) {
        console.error(ex);

        process.exit(1);

    } finally {

         process.exit(0);
    }
}

async function resizeImage(model, data) {
    // resize image and add to frameQueue
    let img;
    let features = [];
    if (model.modelParameters.image_channel_count === 3) {
        img = sharp(data).resize({
            height: model.modelParameters.image_input_height,
            width: model.modelParameters.image_input_width,
        });
        let buffer = await img.raw().toBuffer();
        for (let ix = 0; ix < buffer.length; ix += 3) {
            let r = buffer[ix + 0];
            let g = buffer[ix + 1];
            let b = buffer[ix + 2];
            // tslint:disable-next-line: no-bitwise
            features.push((r << 16) + (g << 8) + b);
        }
    }
    else {
        img = sharp(data).resize({
            height: model.modelParameters.image_input_height,
            width: model.modelParameters.image_input_width
        }).toColourspace('b-w');
        let buffer = await img.raw().toBuffer();
        for (let p of buffer) {
            // tslint:disable-next-line: no-bitwise
            features.push((p << 16) + (p << 8) + p);
        }
    }
    return {
        img: img,
        features: features
    };
}

main().catch(err => {
    console.error(err)
})

then on command line first install nodejs:

sudo apt install nodejs

and then install/run your classify_image.js:

npm install
node classify_image.js path_to_eim_file path_to_image

and here is output of execution on my mddel file and picture:

node classify_image.js car.eim test.1650462255.jpg                                                                                                                   ✘ INT 18s   3.0.0 15:45:06
1
Starting the custom classifier for Ramil Israfilov / Car Parking Occupancy Detection - FOMO (v5)
Parameters freq 0Hz window length Infinityms. classes [ 'car' ]
{
  bounding_boxes: [
    {
      height: 16,
      label: 'car',
      value: 0.9869808554649353,
      width: 8,
      x: 0,
      y: 0
    }
  ]
}

Thanks for that !

I indeed am using python SDK, but it does not implement the letterbox resizing as in Studio
I assume that I could change to node , but I would rather have it working in python, that could help to improve the python SDK by integrating the letterbox resizing (and furthermore, it could be linked to studio config, because the resizing method should be exactly the same as in Studio, and chosen automatically)

@ramazanyich

On which platform do you run that ?
I am trying your script, but I get an error on the ToBuffer() method of sharp

Don’t know why
 are there come dependencies here ? I use a raspbian latest 64bits

node: symbol lookup error: /home/pi/Node2/node_modules/sharp/build/Release/sharp-linux-arm64v8.node: undefined symbol: vips_fail_on_get_type

OK !
I have something that I prefer !
I have added some dependencies and it’s better :

node classify_image.js ../NodeScript/modelfile.eim ../O_yourcamera_20220418-120000.jpg

1

Starting the custom classifier for Wisdoom / StoreRecognition (v10)

Parameters freq 0Hz window length Infinityms. classes [ 'Closed', 'Opened' ]

Before Resize

{

classification: { Closed: 0.9999607801437378, Opened: 0.00003926035788026638 }

}

The classification is still incorrect but at least I do not have a 100% on Closed state :slight_smile:

1 Like

I run it on RaspberrPi 4 with raspbian OS lite 32-bit (armv7):

pi@raspberrypi:~ $ uname -a
Linux raspberrypi 5.10.103-v7l+ #1529 SMP Tue Mar 8 12:24:00 GMT 2022 armv7l GNU/Linux

1 Like