Hi, I am working on Audio Classification to detect alarm. here is my project.
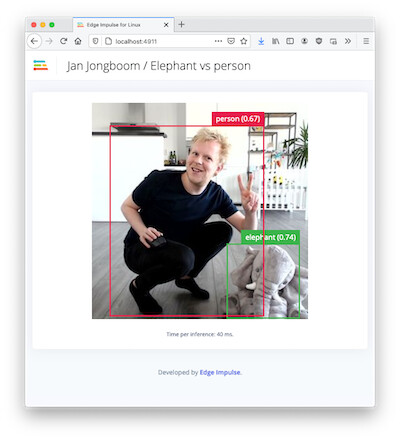
I was able to follow this tutorial run impulse locally. but It only worked when I paste the raw features manually. I want to detect real-time audio in my local server just like when I deploy directly to computer/smartphone like in the pict attach belo, is it possible that I run the model real-time in local server?
Hi @desnug see https://docs.edgeimpulse.com/docs/edge-impulse-for-linux it has examples in a variety of languages.
hi @janjongboom,
- currently I’m windows user, is there a way that I can run on windows?
another question
2. is it possible for me to download notebook testing model (confussion matrix)?just like this notebook
Hi @desnug,
I do not believe that we have real-time audio examples for Windows (@janjongboom may know of some). It should be possible to develop if not. The Edge Impulse C++ SDK library will compile for Windows (as well as many other operating systems), so long as you have a C++ compiler. See this guide (https://docs.edgeimpulse.com/docs/running-your-impulse-locally-1) for more information on how to do that. This C++ example for Linux (https://github.com/edgeimpulse/example-standalone-inferencing-linux/blob/master/source/audio.cpp) is a good place to start. It relies on alsa for streaming audio data. You would need to convert it to whatever Windows uses for microphone data.
For downloading your model as a Jupyter Notebook, head to the Learning Block page in your project (e.g. “NN Classifier”). Take a look at the URL. For example, the URL on one of my projects’ NN Classifier page looks like this:
https://studio.edgeimpulse.com/studio/76063/learning/keras/37
76063 is the projectId
37 is the learnId
Plug those numbers into the URL given by the page you linked. In my case, https://studio.edgeimpulse.com/v1/api/{projectId}/training/keras/{learnId}/ipynb becomes:
https://studio.edgeimpulse.com/v1/api/76063/training/keras/37/ipynb
That should download the Notebook for your Learning Block!
-
I can’t find real-time audio examples for windows user in documentations, maybe in the near future @janjongboom can make example for windows user…
-
yes I know how to download notebook, but the code inside notebook only to saved the model. is there a notebook for testing the model and displaying the confusion matrix?so I can test on my jupyter notebook?notebook project
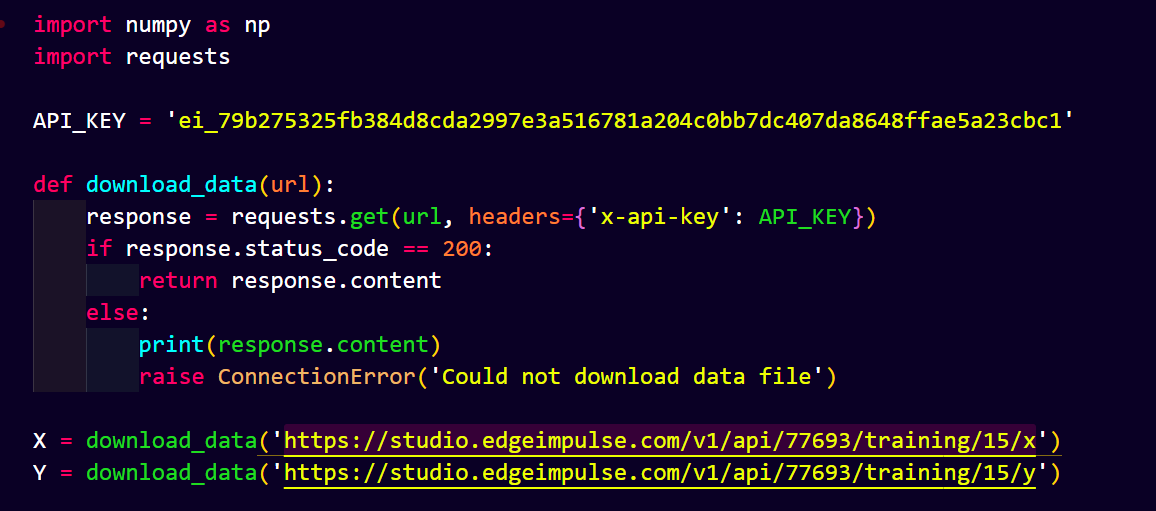
in below pict I only can download the training npy, is it possible to download X and Y test npy data?
-
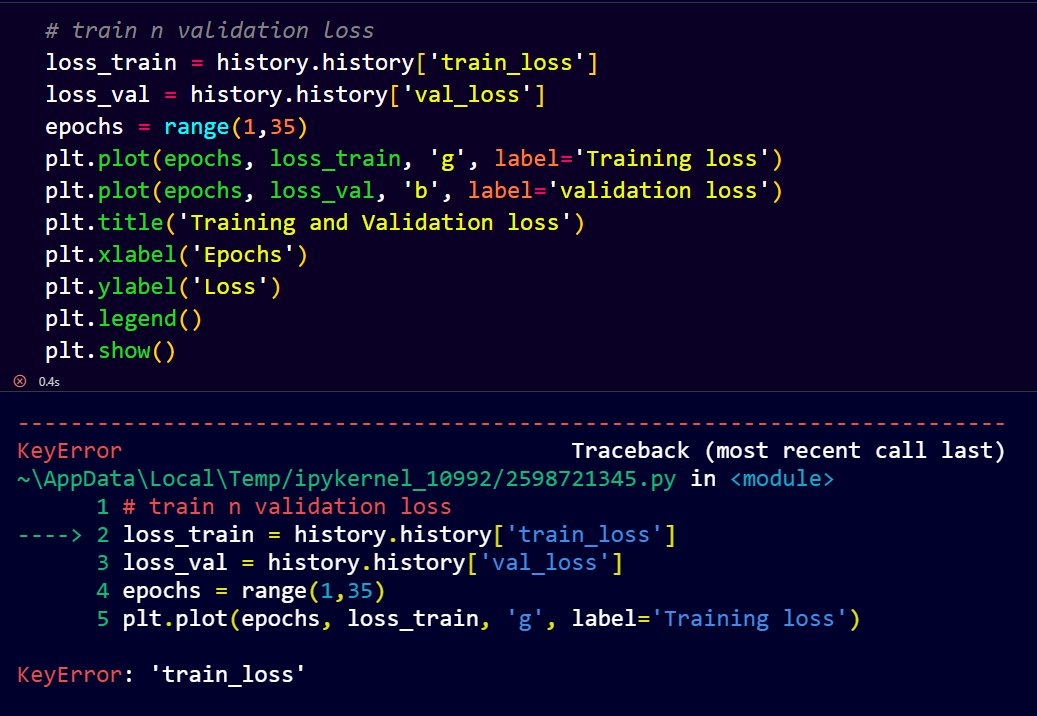
from the notebook I want to visualize train and loss, but got some errorr:
and
usually I use that line code for visualize, but I can’t find train_loss and acc…
@desnug Other users have reported this working under WSL2, e.g. see Run eim model in linux distro
Windows is not a supported platform on our end, so have not tried this myself.
1 Like
Hi @desnug,
I’m working on finding out if you can download the testing set using a similar API call, as I don’t see how to do so as well. I’ll let you know if that’s possible.
For plotting the history, you need to store the output of the .fit function as follows:
history = model.fit(train_dataset, epochs=30, validation_data=validation_dataset, verbose=2, callbacks=callbacks)
From there, you can plot the accuracy and loss (this worked for me):
import matplotlib.pyplot as plt

plt.plot(history.history['accuracy'])
plt.plot(history.history['val_accuracy'])
plt.title('model accuracy')
plt.ylabel('accuracy')
plt.xlabel('epoch')
plt.legend(['train', 'validation'], loc='upper left')
plt.show()

plt.plot(history.history['loss'])
plt.plot(history.history['val_loss'])
plt.title('model loss')
plt.ylabel('loss')
plt.xlabel('epoch')
plt.legend(['train', 'test'], loc='upper left')
plt.show()
Hi @desnug,
For downloading the test set via the API, you first need to go to Model testing > Classify all to generate the test set features. A link should be available in the Dashboard to download the test set and labels. You can then call the API with something like the following:
# Download test set
X_test = download_data('https://studio.edgeimpulse.com/v1/api/76063/dsp-data/33/x/testing')
Y_test = download_data('https://studio.edgeimpulse.com/v1/api/76063/dsp-data/33/y/testing')

# Create test files
with open('x_test.npy', 'wb') as file:
    file.write(X_test)
with open('y_test.npy', 'wb') as file:
    file.write(Y_test)

# Read files
X_test = np.load('x_test.npy')
Y_test = np.load('y_test.npy')[:,0]
hi @shawn_edgeimpulse thanks for your help.
one last question…
I have followed from this link to evaluate model performance and visualize confusion matrix. but when I tried to implement the notebook from edge impulse project got some error. could you please help me to solve this?
here is my notebook from google collab…
regards,
Hi @desnug,
The datasets are stored in batch format, where each sample and ground-truth label is zipped together. You’ll need to first unzip them and save them as Numpy arrays before performing prediction:
# Extract samples and labels from validation set (which is batched)
X_val = np.concatenate([x for x, _ in validation_dataset], axis=0)
y_val = np.concatenate([y for _, y in validation_dataset], axis=0)

# Run inference on validation set
y_pred = np.argmax(model.predict(X_val), axis=1)

# Convert one-hot encoding to label encoding for ground-truth labels
y_true = np.argmax(y_val, axis=1)
From there, you should be able to create your confusion matrix:
import seaborn as sns

# Labels from project
labels = ['biohazard', 'fire', 'gas', 'noise', 'tsunami']

# Show confusion matrix
confusion_mtx = tf.math.confusion_matrix(y_true, y_pred)
plt.figure(figsize=(10, 8))
sns.heatmap(confusion_mtx,
            xticklabels=labels,
            yticklabels=labels,
            annot=True, fmt='g')
plt.xlabel('Prediction')
plt.ylabel('Label')
plt.show()
1 Like
hi @shawn_edgeimpulse thanks, now it’s work.
btw if I want to use test dataset that downloaded from link below, should I unzip first with the code that you told me before?
Download test set
X_test = download_data(‘https://studio.edgeimpulse.com/v1/api/76063/dsp-data/33/x/testing’)
Y_test = download_data(‘https://studio.edgeimpulse.com/v1/api/76063/dsp-data/33/y/testing’)
Hi @desnug,
Yes, you will want to make sure that the URLs match the download links for the X and Y testing sets in the Studio (you can find those in the Dashboard if you hover over the download link). For example:
# Download test set
X_testing = download_data('https://studio.edgeimpulse.com/v1/api/77693/dsp-data/19/x/testing')
Y_testing = download_data('https://studio.edgeimpulse.com/v1/api/77693/dsp-data/19/y/testing')
hi @janjongboom
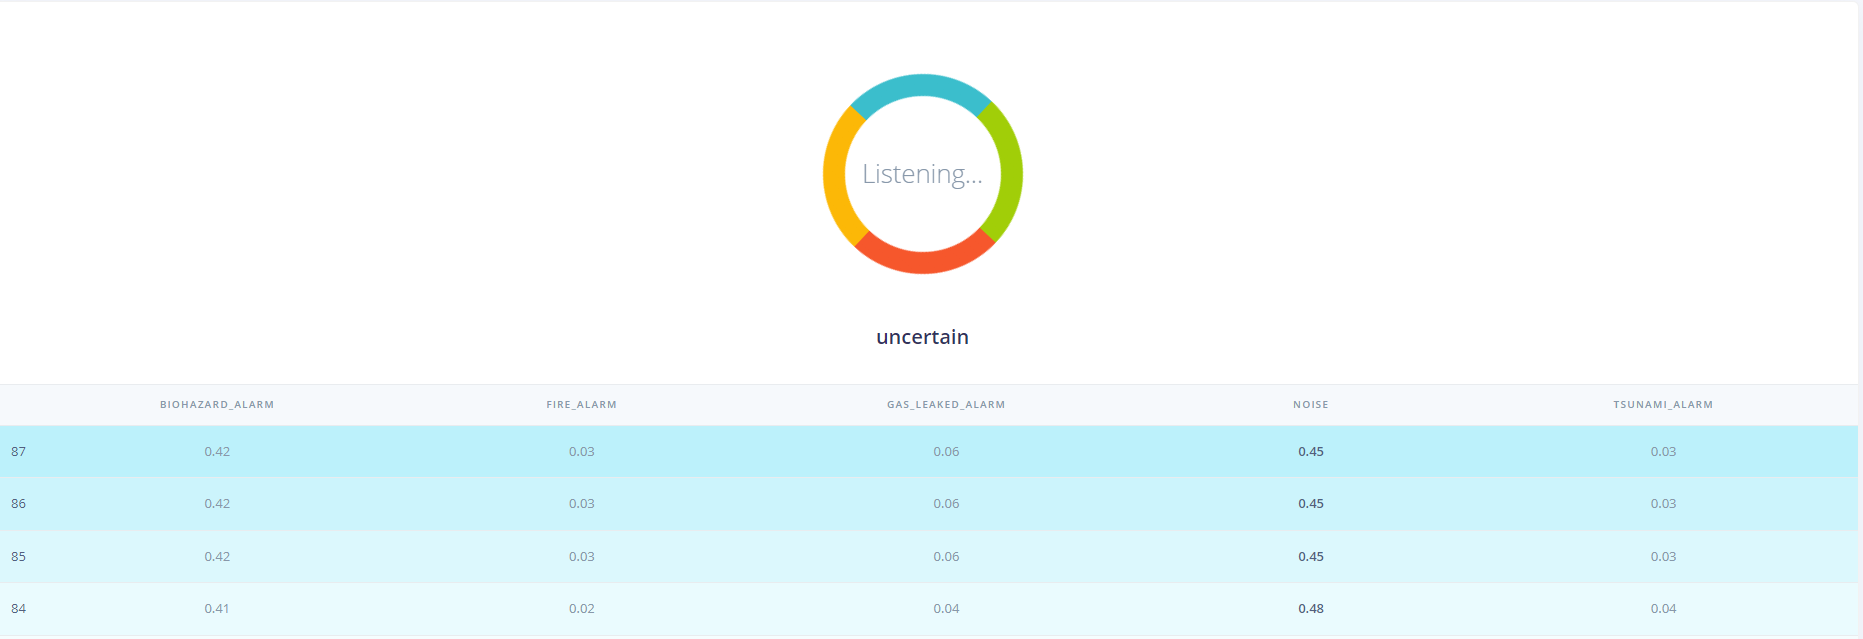
I have successfully deployed my project regarding audio classification to raspberry pi4. and I followed your tutorial in this video, based on your tutorial, when you running the cli impulse it will open a webserver in real-time. My question is, is it also possible to classify audio in realtime via a browser? Just like when we deploy it to a smartphone?just like ini this picture, but for audio purposes?
Hello @desnug,
You can use the mobile client which can run on your mobile phone or your computer. Go to Deployment and select Computer or Mobile phone and click on build:
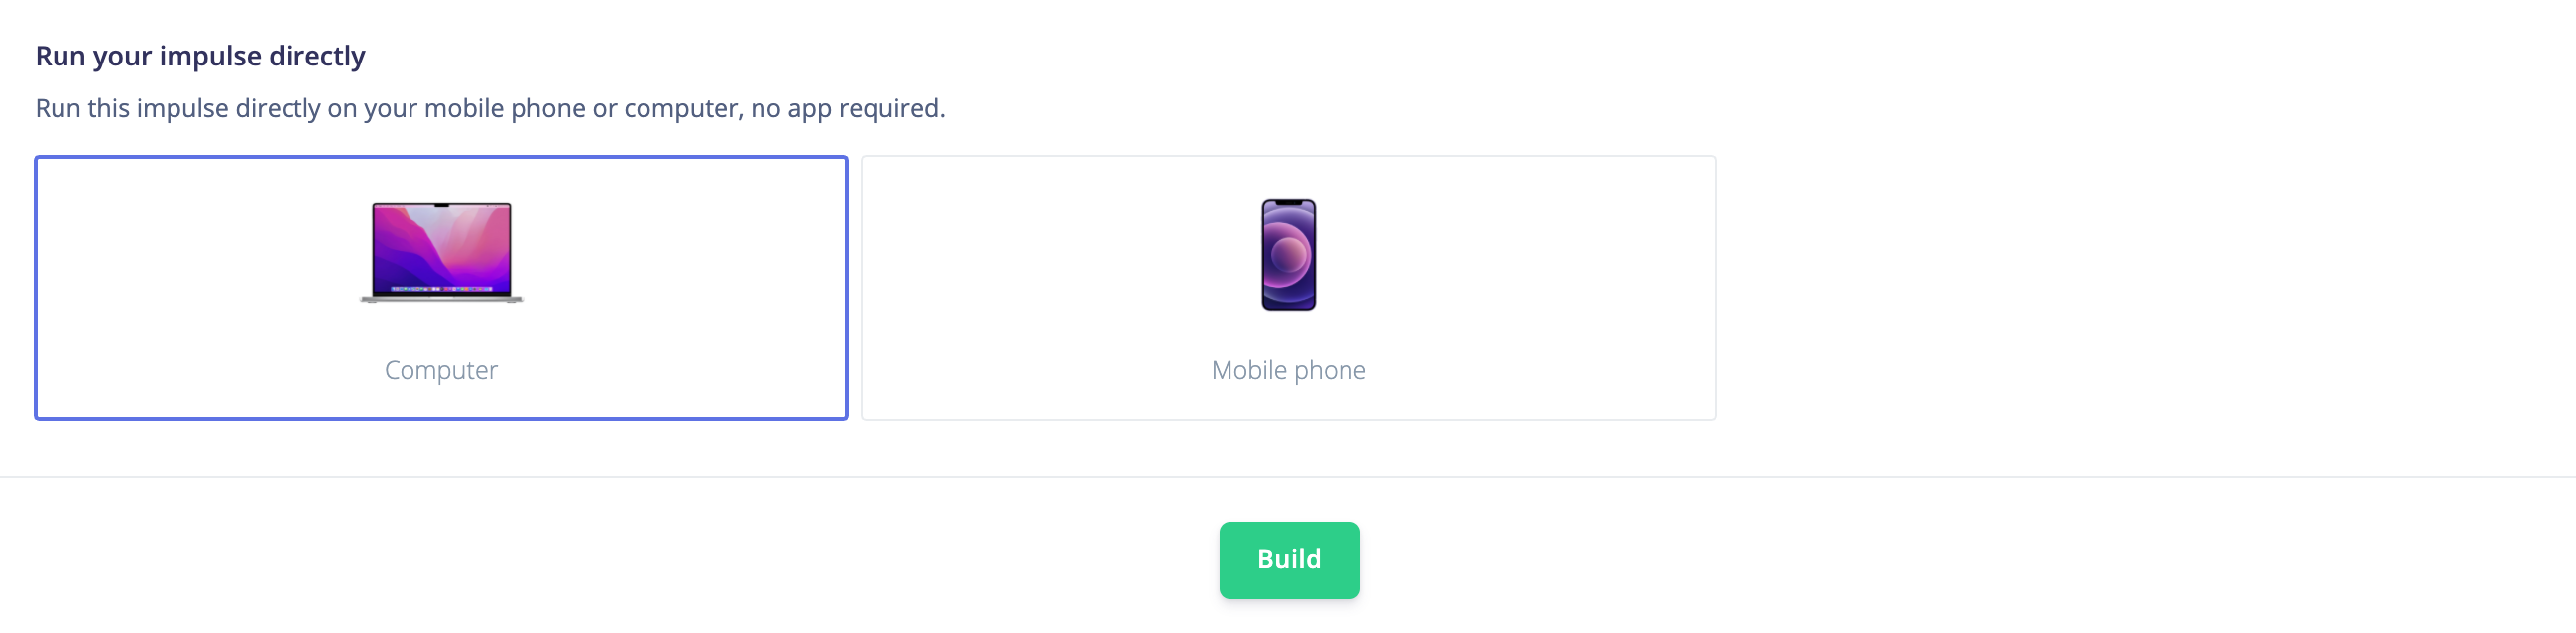
It will open a web interface:
Finally if you want to reimplement something yourself, the mobile client is open source: https://github.com/edgeimpulse/mobile-client
Regards,
Louis
hi @louis
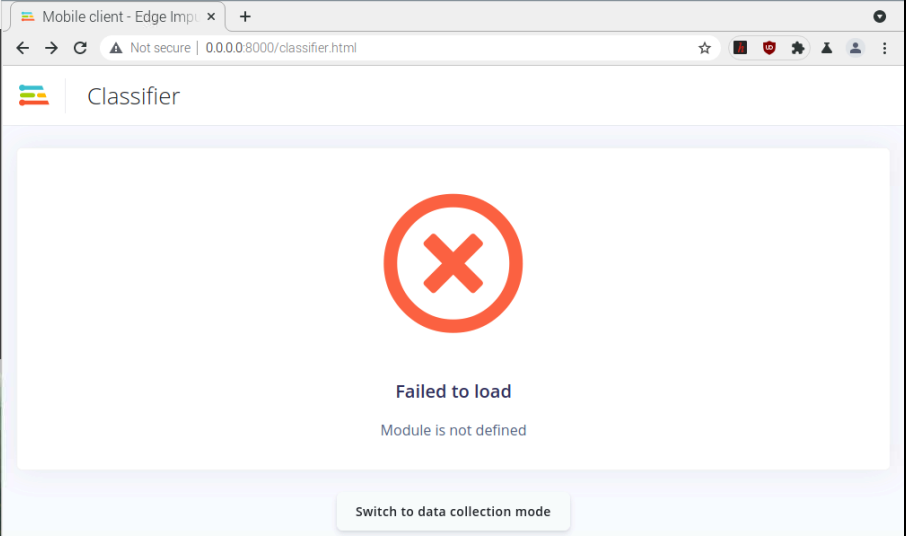
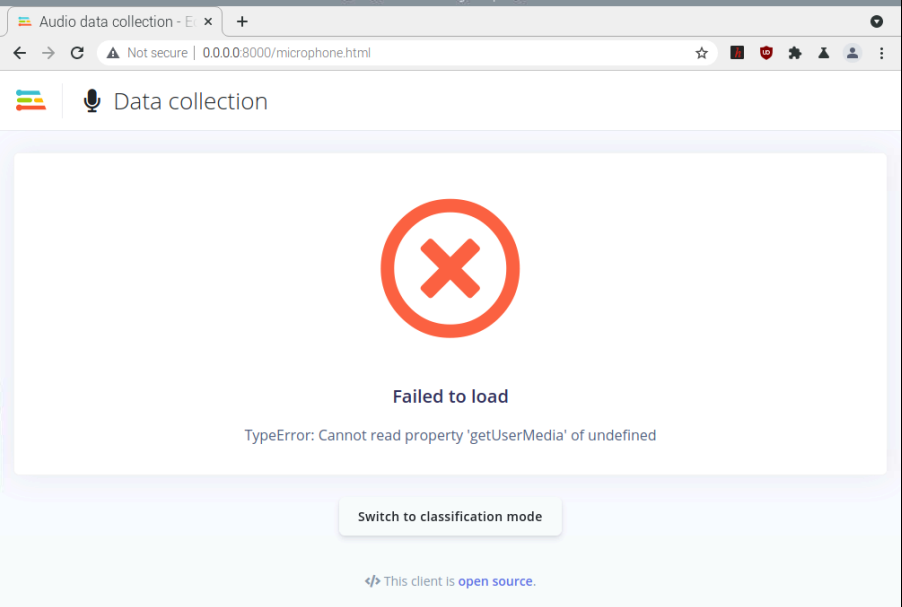
I’ve tried to implement by myself. following tutorial in this link. but got some error…how to solve this?I’ve run this on raspberry pi4
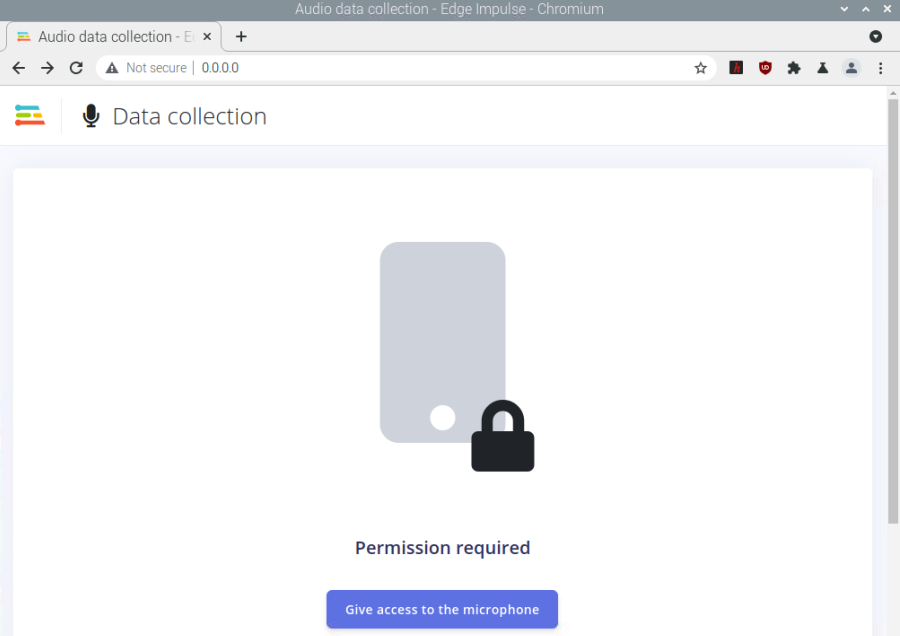
when I tried to access microphone:
Hello @desnug,
I do have the same Module is not defined error when trying on my Macbook for the Classifier part.
I’ll create an internal ticket to see what could have changed recently and to fix the issue.
For the Data collection part, I can collect data on my side (note that I am using Ngrok as suggested in the README to establish an HTTPS connection). Which browser are you using on your RPI maybe it is blocking the microphone / camera on insecure connection?
Regards,
Louis
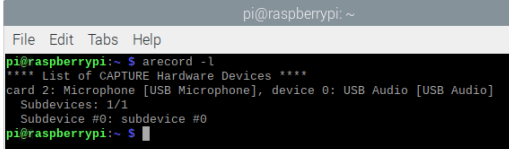
hi @louis
I am using chromium browser. when I use edge impulse cli, working fine even with python SDK…
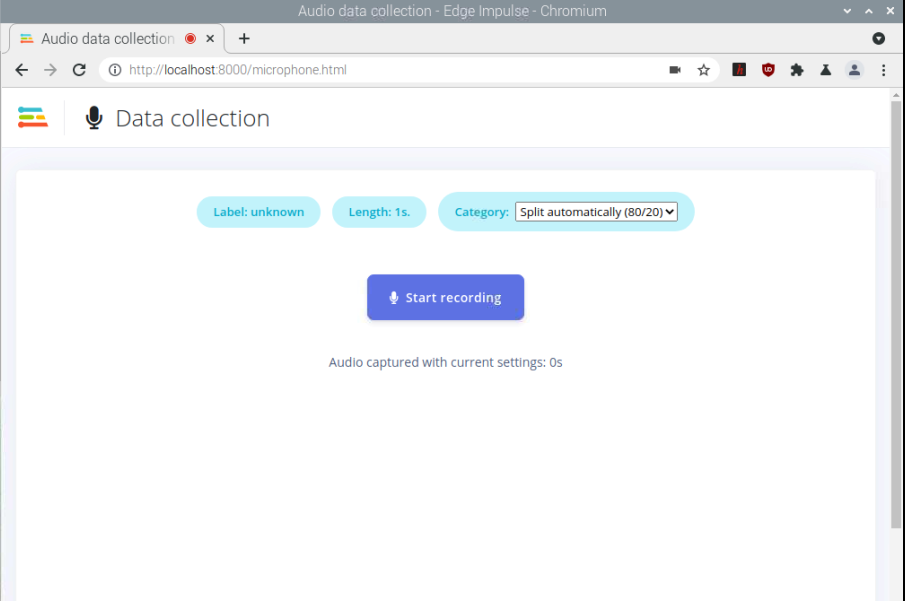
I am using usb microphone.
after click “give acces combo box” its become failed to load, this IP (0.0.0.0) is given when I type
python -m SimpleHTTPServer
when I’m trying using ngrok now it’s work…I don’t know why using 0.0.0.0 not work
btw I’m a little bit confused about the working principle of the system using this mobile client, where do we put our model? or how to call a model that has been created using edge studio? unlike using an SDK that uses modelfile.eim located on my local drive.
I hope Module is not defined problem can be fix soon. please inform me if its fixed…thanks @louis
regards,
Hello @desnug,
The mobile client loads the WebAssembly version of the model so you can use the inference offline.
The WebAssembly model contains the same information and parameters as your edge impulse model linux binary (.eim) but it has not been compiled for your dedicated hardware (x86_64, armv7 or AARCH64 for example). So it is not as optimized as the model.eim
I’ll let you know when I have more info.
Regards,
Louis
hi @louis,
- Has the problem I asked about before on the local mobile client been resolved?
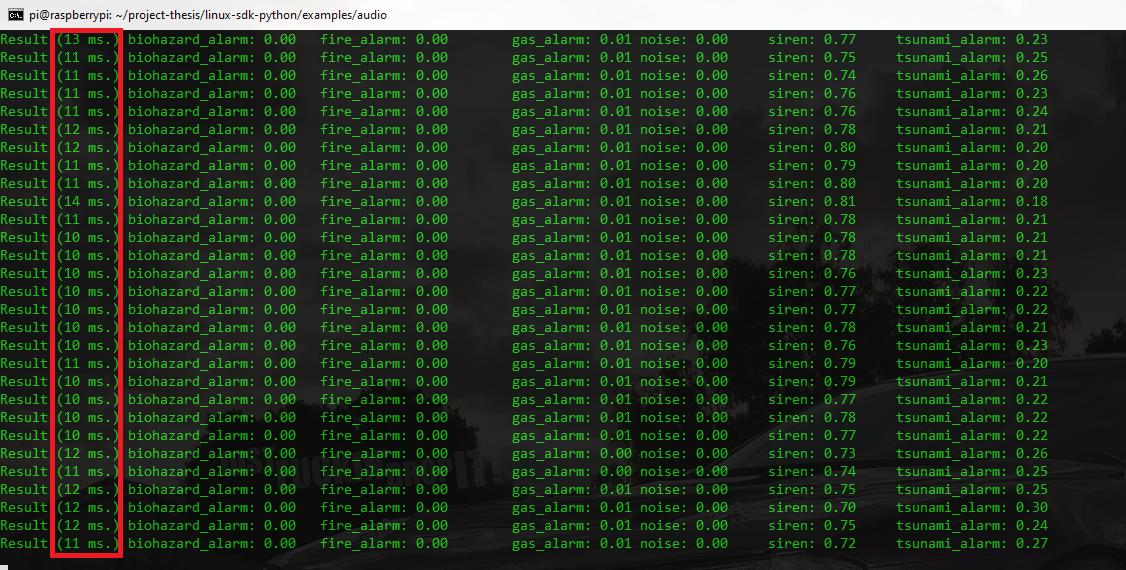
- I am running edge-impulse with python SDK.
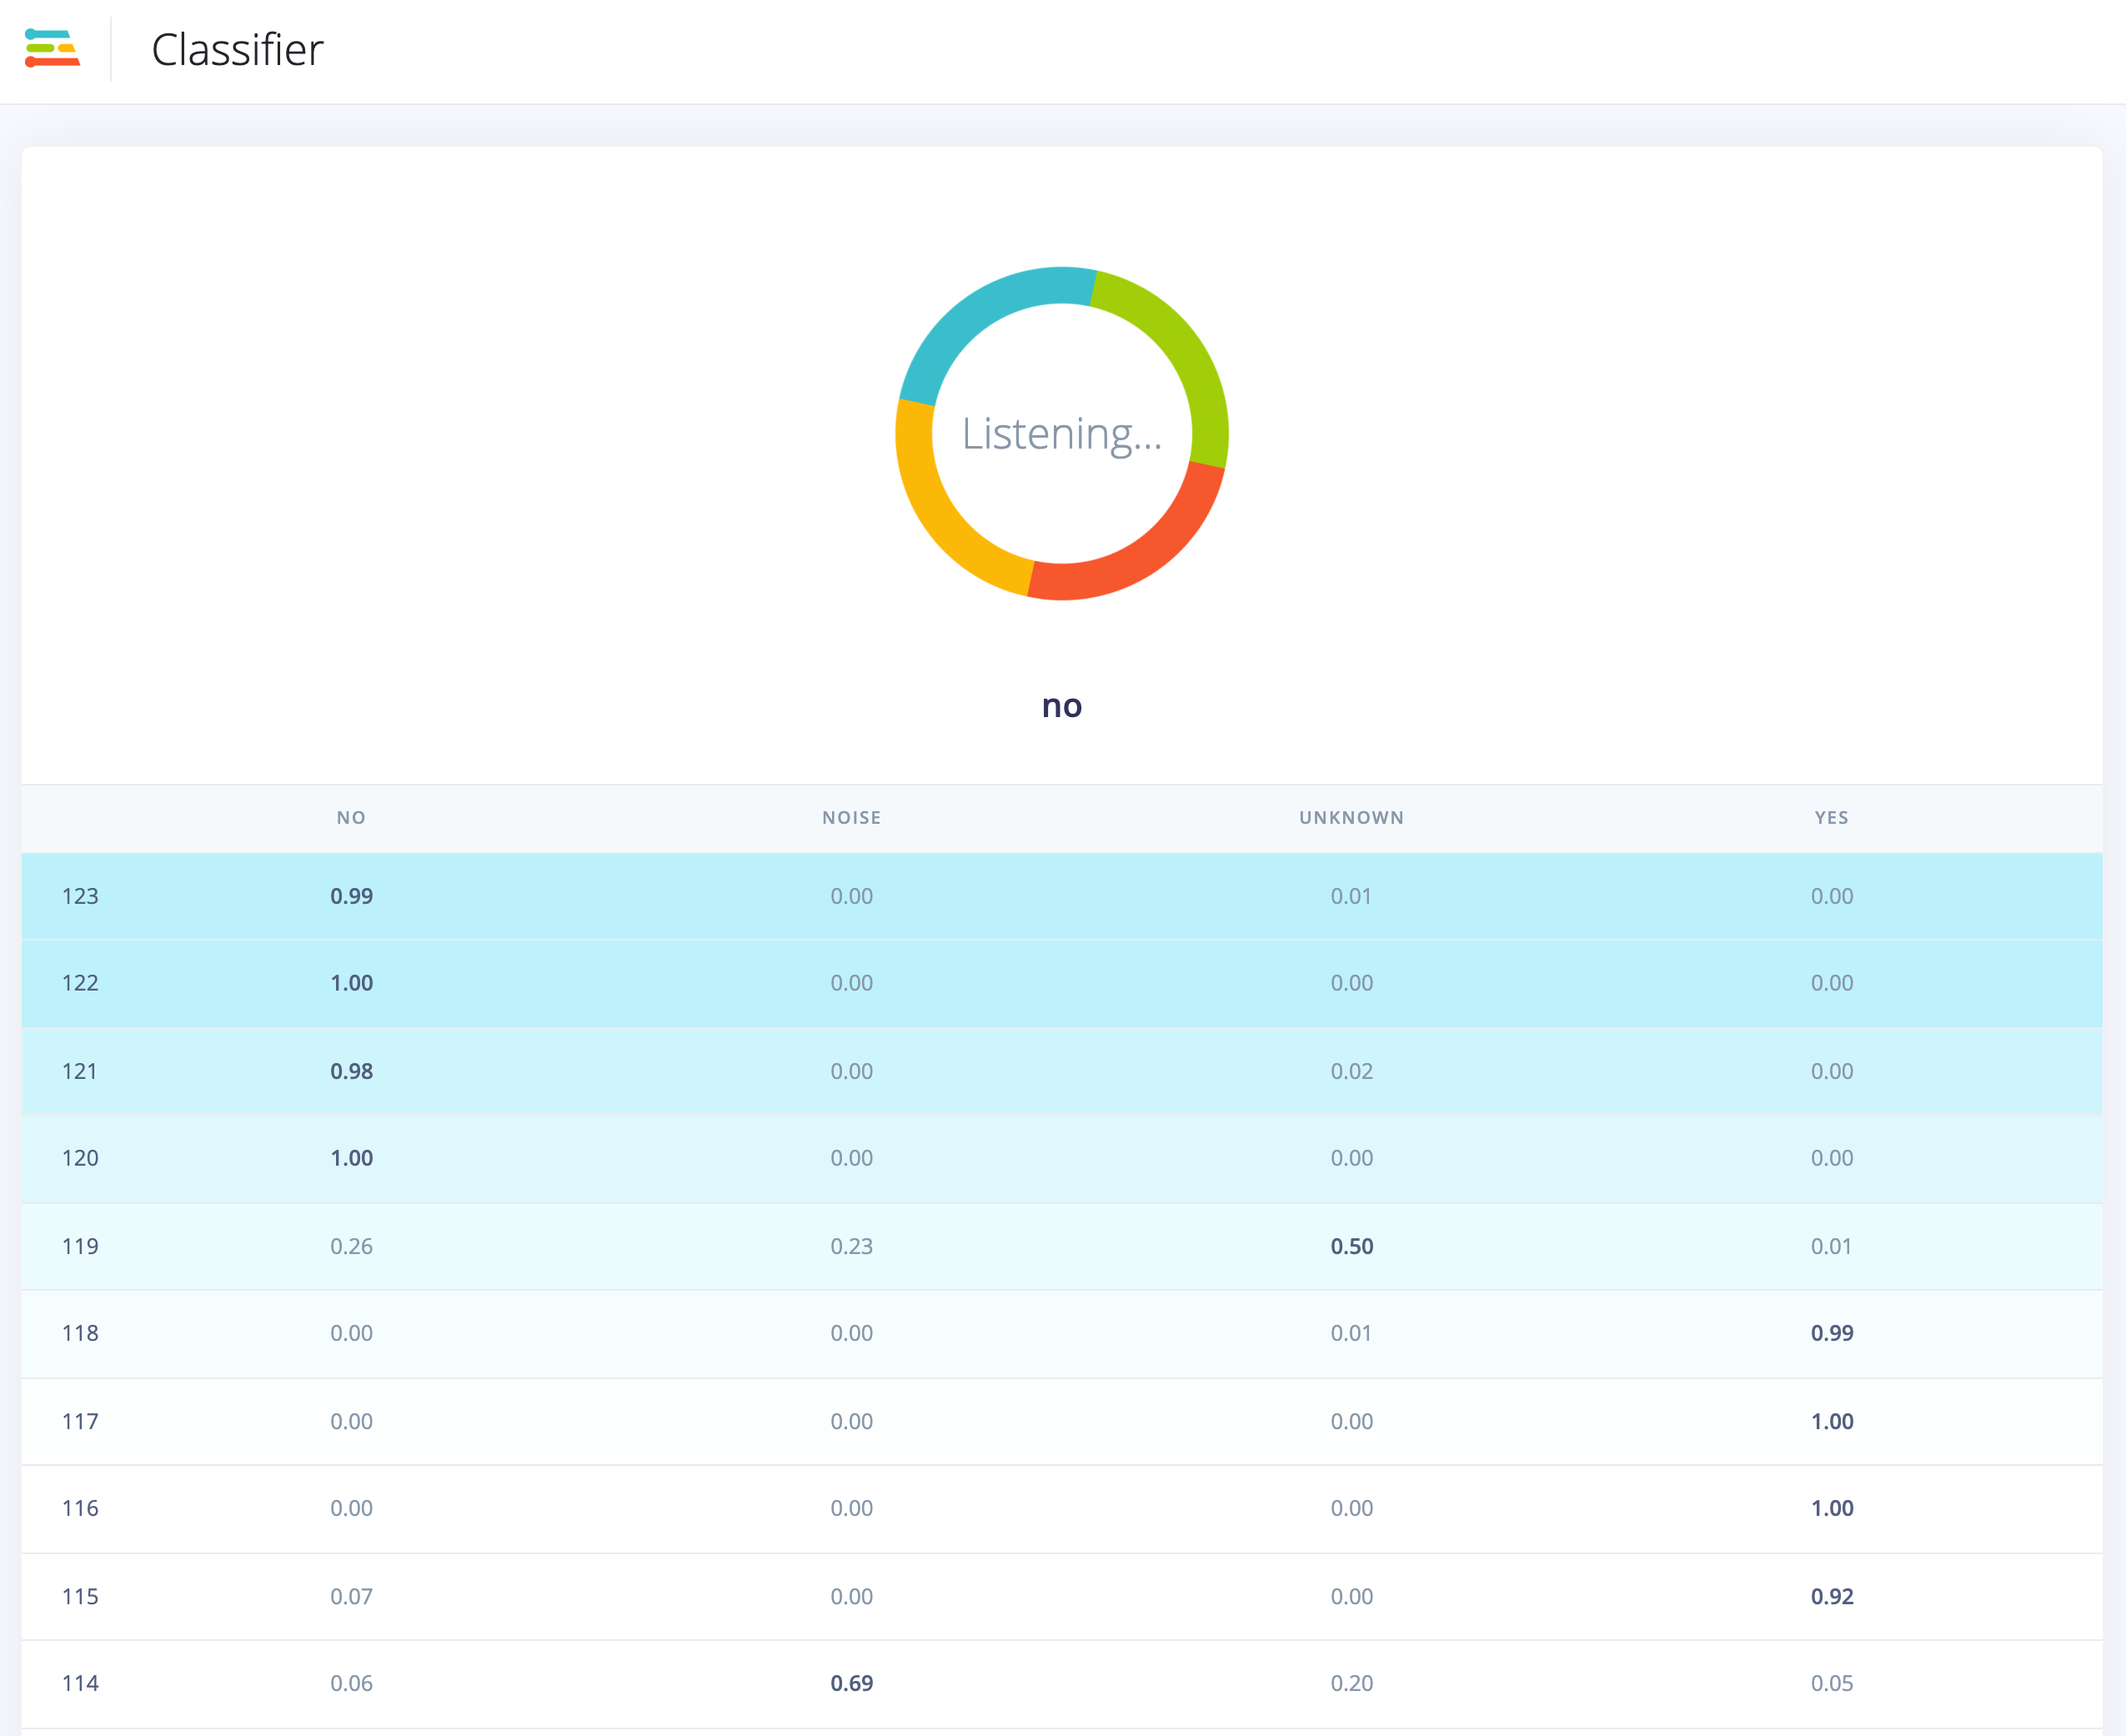
what is the value in the result column? does that mean how long it takes to capture real-time audio?
can we increase the value of the result? maybe around 1 second?